Article
What should buyers know first?
Short answer: Plan halter neck dress development with connected neckline and back details, fastening review, coverage questions and clear records for sample approval.
Halter neck dress development requires the neckline, front, back and fastening to be reviewed as one garment. A buyer should define the intended coverage and appearance, explain how the wearer will put the dress on, and identify what the sample must demonstrate. A back-view photograph or a general request for a halter shape cannot settle the complete connection, adjustment, lining or internal construction.
Yinshan Fashion supports custom and private-label bulk enquiries for fashion brands, including small-batch womenswear programmes. Specific halter designs, materials, specialist details, quantities and commercial conditions need project review rather than being assumed from a category name. This is a development route, not unrestricted ready-stock wholesale. The following guide helps a buyer prepare that discussion and record the sample decision without promising universal support, comfort or fit.
Define the Brief for Halter Neck Dress Development
Start by drawing the actual neckline arrangement. Halter is a broad description for designs arranged around the neck rather than conventional straps over each shoulder. A high front, a neck tie, a shaped band and another fastening arrangement can create quite different garments. Show the proposed version in front, side and back views. If the drawing leaves a connection hidden, mark it as an unresolved detail. The factory should not need to invent the back because the only reference shows the front.
Describe the garment's role in the range. Is the neckline the central design feature, or is the open back more important to the intended appearance? Does the dress need to coordinate with an outer layer? Which ordinary activities should the sample review include? These questions help the brand set priorities before the technical team proposes a construction route. They do not establish that any design is suitable for every person or occasion. The brief should remain tied to the customer and use the brand has chosen.
Identify the buyer's fit reference and size system. State the intended relationship through bust, waist and hip, and include the proposed length. Where internal support or particular underlayer compatibility is expected, make it explicit instead of relying on the image to imply it. A style code and revision should connect the drawing, material candidates and sample comments. The development record then describes one garment, allowing the team to distinguish a technical revision from a change in the design target.
The Dress Collection is a starting point for discussing dress silhouettes with Yinshan Fashion. Select references for the features they actually show, and list the requested changes separately. A related dress example does not confirm that an unreviewed halter construction or support feature has already been established for your project. Ask for feasibility and sample requirements against the complete brief before turning the direction into a production assumption or a customer-facing claim.
Map the Neckline, Front and Back as One Design
Put the front and back drawings on the same review sheet. Mark neckline edges, attachment points, openings and the intended waist and upper-back relationships. Add side views where coverage needs clarification. A front accepted in isolation can conflict with the chosen back, particularly when the reference images come from different garments. The brand should decide how those references become one original design and identify which relationships are essential before asking the factory to make a sample.
Name the connection details rather than treating them as invisible implementation choices. If a neck band joins the front panels, show where and explain the intended visible finish. If the design uses ties, show their route and final arrangement. If the fastening is hidden, include an inside view or a clear question for the factory. A buyer need not specify an unverified technical method, but should communicate the required appearance and use so the proposed construction can be assessed against a meaningful target.
Review the whole garment when a connection point changes. Moving an attachment to alter the front may affect the back position or side coverage. Describe the observed relationships and ask the technical team which revisions should be considered together. Avoid approving separate fragments from several samples unless the final combined garment is also reviewed. A neckline from sample A and a back from sample B may represent a useful direction, but their combination is a new proposition until the team has evidence for it.
If the brand is considering a related halter top, the Blouse Collection offers a relevant top-development route. Keep that product separate from the dress even when the neckline direction is shared. Its body length, intended outfit and construction may differ. Carry the design idea across the range through explicit references, then define what each garment needs to demonstrate. This avoids expanding a dress approval into an unsupported assumption about a top that has not yet been sampled.
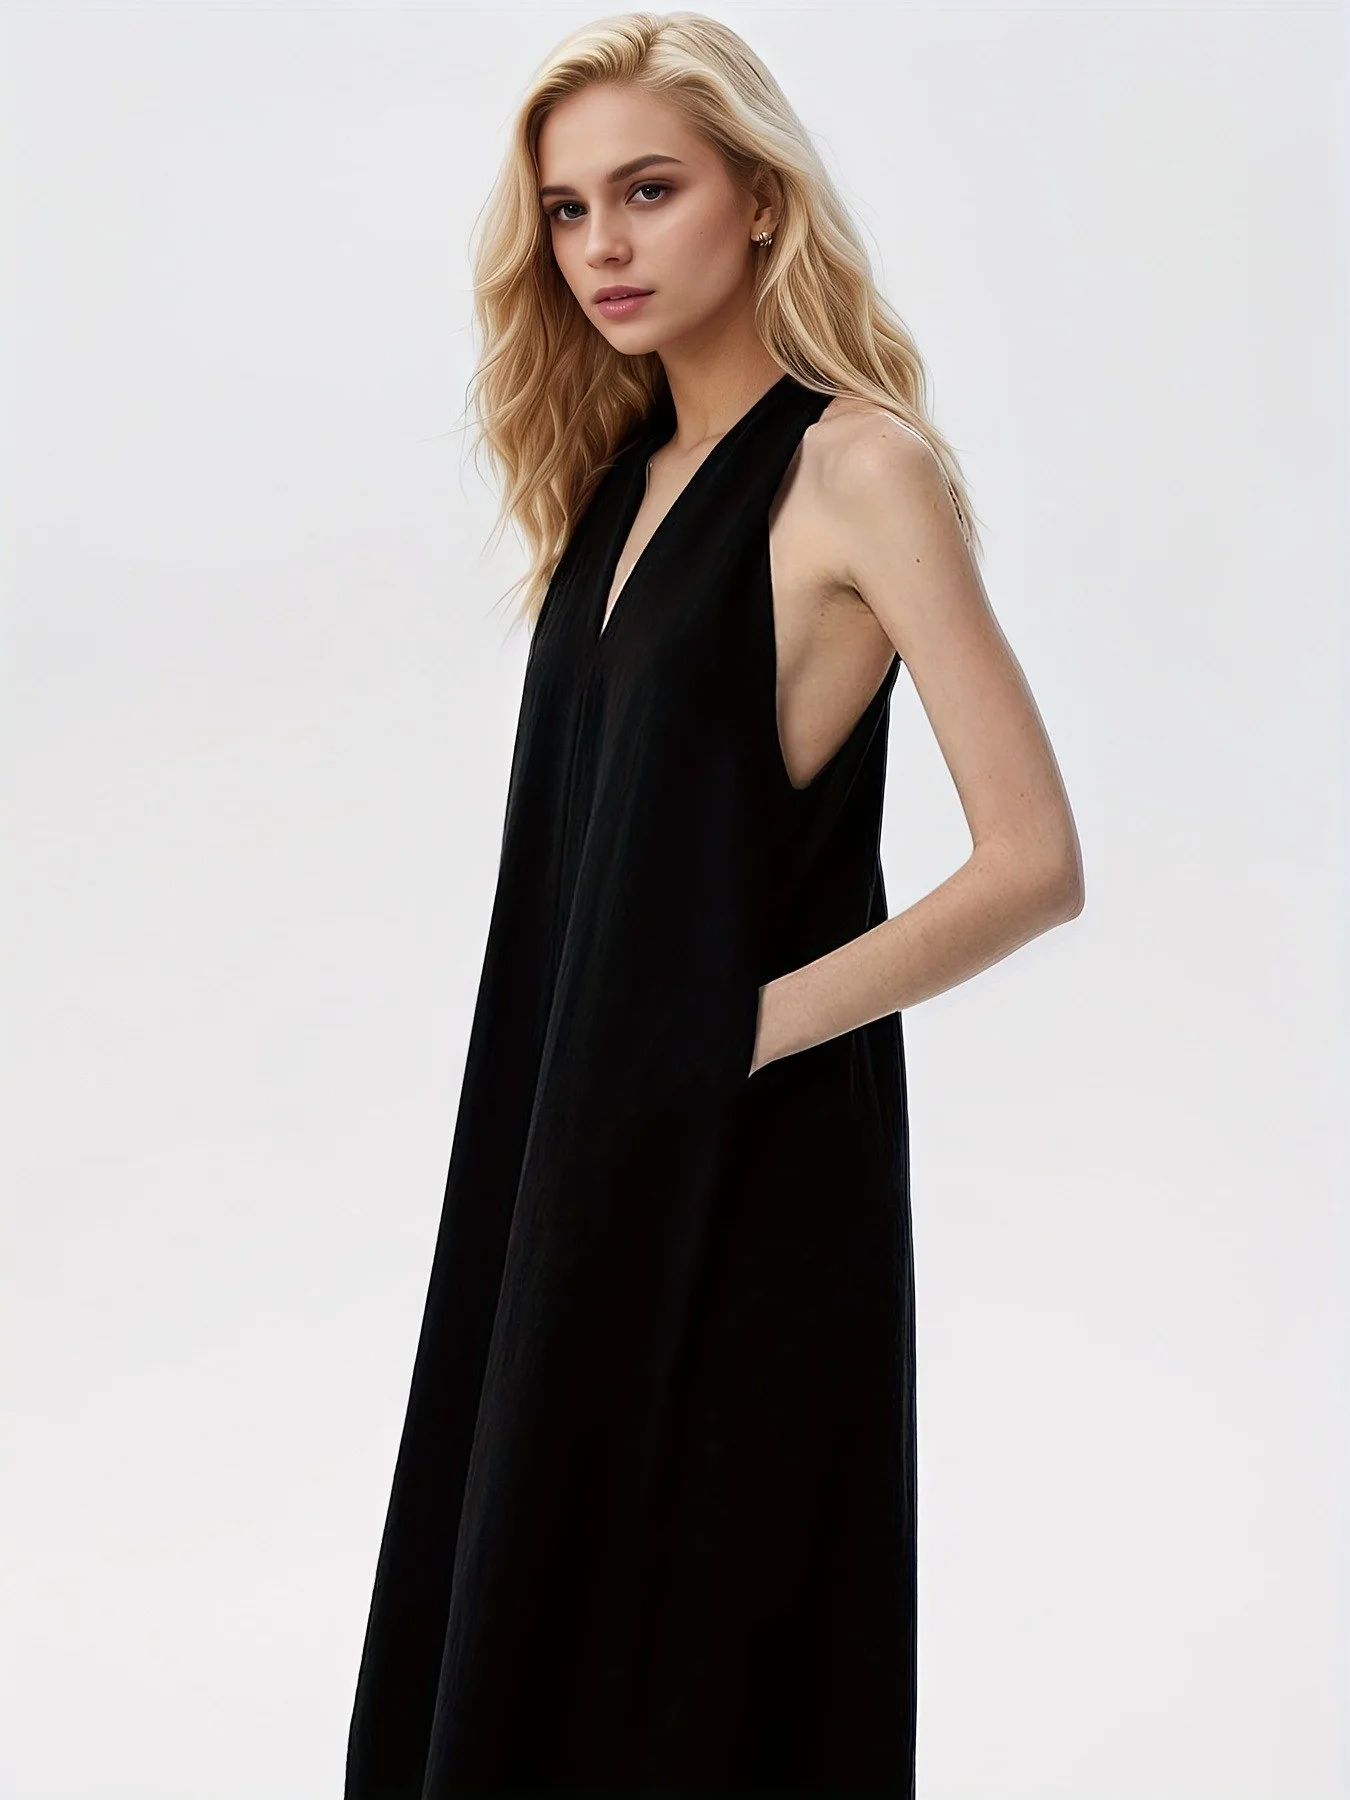
Neckline reference: this side-front view makes the armhole relationship visible. The back fastening is not shown and needs its own identified sample view and approval record.
Specify Ties, Fasteners and Adjustment
Describe the fastening in terms of both appearance and use. Identify its location, the proposed component or tie arrangement and whether adjustment is intended. Ask how the wearer will reach, close and open it. A photograph of the back may show a decorative shape without explaining the actual operation. The sample brief should therefore include the intended dressing sequence and any accessibility or handling concern the brand wants assessed, without assuming that every wearer has the same reach or preference.
For ties, define the desired appearance and the information needed to review it. Record the tie material, attachment and the setup used in fitting. If the reviewer changes the tie position or arrangement, note the change before comparing neckline results. A visually similar knot can conceal a different setting. The approval should describe the arrangement actually reviewed rather than relying on the phrase “adjustable tie” to suggest unlimited fit flexibility or a universal solution to neckline and coverage concerns.
For hardware or other fasteners, keep an identifiable component reference. Inspect the sample's visible and internal placement, and record any difficulty observed during ordinary use. Those observations can support a development decision, but they are not a substitute for formal testing where a test-dependent claim or requirement exists. If the brand needs such evidence, specify the requirement separately and obtain appropriate qualified support. Do not turn a successful opening and closing demonstration into a broad durability or safety guarantee.
The custom womenswear development route can be used to discuss the proposed connection and fastening with Yinshan Fashion. Send front, back and inside references together, including what must remain visually discreet and what may change. Ask which sample work is required to assess the combination. Confirm material availability and commercial assumptions after a component is selected. A fastening chosen during development should not be silently replaced later under a general instruction to use something similar.
Review the Intended Support and Coverage
Put support expectations into the brief as questions to resolve, not as claims already established by the drawing. A halter arrangement does not automatically imply internal cups, boning or a particular support outcome. If the brand wants specialist structure, identify the requirement and ask for feasibility and sample evidence. The technical discussion should address the actual material, pattern and construction. Avoid using a styled photograph as proof that a proposed garment can be worn in the same way by every customer.
Review front, side and back coverage on the agreed fit reference. State the intended underlayer conditions and record any relevant adjustments. If the sample creates an opening or exposes an area beyond the target, identify the location and activity. “Needs more support” can conceal several different observations, including garment position, coverage or wearer feedback. Describe those separately so the technical team can investigate the actual concern rather than selecting a structural addition without understanding the buyer's intended result.
Distinguish the wearer's experience from an engineering conclusion. Feedback that an area feels uncomfortable or that the wearer wants a different level of coverage is valuable. Record it respectfully and stop the review if necessary. The feedback should not be dismissed because the sample matches a measurement, nor should it be converted immediately into a claim about the cause. The responsible technical reviewer can assess the garment and propose a response while the brand clarifies its design priorities.
Keep product language within the evidence. Terms that imply universal support, guaranteed comfort or suitability without underlayers require more than a limited fitting. A precise description of the actual neckline, back, lining and fastening is often more useful to the customer. If the sample review reveals that the intended use needs to change, update the brief and later product description. It is better to make a clear design decision than to preserve an attractive claim that the garment has not been shown to support.
Observe Comfort and Garment Position
Agree the review conditions before the wearer puts on the sample. Identify the garment version, materials, size, underlayers and tie or fastening setting. Explain the planned movements and obtain appropriate consent for photographs or video. The review should be comfortable and can stop at any point. Keep personal information in the internal fit record rather than public marketing materials. The aim is to collect useful observations about one sample under defined conditions, not to test the wearer's tolerance or make medical judgments.
Begin with relaxed standing views and note the neckline, front, side and back position. Record where the garment sits and any immediate feedback. Then observe the agreed ordinary movements, which may include sitting, returning to standing and moving the arms. If the garment changes position, document the sequence and whether adjustment was needed. Do not restore the dress before taking every photograph and then conclude that no movement occurred. The adjustment itself may be part of the product experience the buyer needs to evaluate.
Localize the feedback. A concern at the neck, upper back or front should be linked to the relevant area and activity. Include the wearer's words where helpful, then add the garment observation without inventing a diagnosis. If the issue is unclear, state what remains unknown and ask for technical review. This is more constructive than prescribing tighter ties or a smaller dimension as an automatic fix. Such changes may alter other relationships that the brand has already accepted.
Use the dress sample fit checklist to connect the halter-specific observations to the wider garment review. The neckline deserves attention, but so do the waist, closure, lining and hem. A pleasing back detail does not resolve an unrelated fit concern, and a lower-body revision should not erase the accepted neckline setup. Keep accepted points and open questions visible together so that the next sample has a clear, coherent target.
Check Dressing, Undressing and Closure Access
Write down the intended dressing sequence in plain language before judging whether it works as expected. Identify which fastening opens, how the garment is positioned and when the neck detail is secured. The exact sequence depends on the design; the purpose of writing it is to expose assumptions. If the buyer and sample team imagine different operations, they may evaluate the same garment differently. A short sequence gives the review a shared starting point and can reveal missing information in the original brief.
Observe the actual operation under appropriate, private conditions. Record any difficulty reaching the closure, understanding the tie arrangement or positioning the garment. Do not assume that one successful demonstration establishes ease of use for everyone. If the brand has specific customer needs, include them in the development brief and seek appropriate input. The review can identify a concern and prompt another design discussion without claiming to establish universal accessibility or usability from a single wearer.
Inspect the garment after the sequence as well as during it. Confirm that the intended neckline and back setup can be achieved and recorded consistently. If the wearer needs assistance or makes an adjustment, note that fact and decide whether it is acceptable for the intended product. The brand may choose to revise the fastening, clarify instructions or reconsider the design. Those are separate options with different implications, and the approval record should state which one was selected rather than leaving the issue as an informal observation.
The fashion product brief guide can help organize the resulting instructions and open questions. Any customer-facing dressing guidance should match the final garment and be reviewed alongside it. Do not prepare instructions from an early sample and assume they remain correct after a closure change. The final record should connect the accepted component, operation and visual result, giving production and product-information teams the same understanding of how the dress is intended to be used.
Plan Size Review and Construction Revisions
After the base sample questions are addressed, agree how the size range will be reviewed. Identify relevant sample sizes, measurements and wearing observations rather than assuming that a single neck setting works across the range. The brand should provide its size system and intended fit relationships. A size label is not a complete specification. The technical team needs the actual targets and should explain which details require further review when the pattern and components are developed for additional sizes.
Consider the neckline, front, back and fastening together during that review. Tie length or an adjustment feature should not be treated as proof that every size concern is solved. Record how the garment is set up in each reviewed size and identify any different component or construction. If a sample is unavailable for part of the range, state the evidence limitation and decide what is required before release. A transparent scope is preferable to an unsupported statement that the entire range has been verified.
When revising construction, list known changes and their intended purposes. If the team changes the neck band, front shape and lining together, the next sample is a new combination. It may be accepted as a combination without proving which individual change caused an improvement. Preserve that distinction so a later substitution does not rely on a false causal conclusion. If the cause matters to the next decision, ask the technical team what further comparison would be useful and practical.
Update all affected records after the revision. Drawings, measurements, component identifiers, sample photographs and dressing instructions should describe the same version. Keep old files as history but make the active document set unmistakable. A colleague joining the project should be able to identify the current target without reading every past message. This is particularly useful for specialist details, where an outdated inside-view photograph can contradict the latest external drawing even though both appear to belong to the same style.
Resolve a Back-Detail Change Before Releasing the Dress
Consider an illustrative scenario in which a brand likes the front of a halter sample but wants a lower back for the final design. The buyer sends a new back reference and asks to retain everything else. That request needs review because the front and back belong to one connected garment. This is a hypothetical development example, not a customer case or proof of a particular construction result. Its purpose is to show how to keep a seemingly local design change from bypassing the full sample decision.
Mark the new back target and identify which connections or closure details may be affected. Ask the technical team to review the proposed combination rather than assuming that the existing front can remain unchanged in every respect. Keep the accepted front appearance as a design priority, but acknowledge the question that the next sample must answer. If the team proposes alternatives, compare them against the brand's coverage, appearance and dressing requirements instead of choosing solely from the most attractive back photograph.
Review the revised sample in front, side and back views, then repeat the agreed dressing and movement observations. Record whether the desired front has been retained and whether the new back introduces a concern elsewhere. If the intended outcomes cannot both be accepted in the current sample, the brand needs to choose a revised target or request further work. A vague instruction to keep all advantages of both references does not resolve a conflict the physical sample has made visible.
Once a version is selected, update the complete brief and product information. Identify the final fastening and any underlayer assumptions that matter to the intended use. Preserve the earlier back reference as history, not as an active option in the production file. This makes the approval understandable: the brand has accepted one identified garment with a documented setup and review scope. It has not approved a collection of interchangeable front and back ideas that have never been assessed together.
Prepare the Approved Detail Record
Include a labelled close view of the fastening in its open and closed positions where that is useful and appropriate. A single attractive back image may conceal the operation the receiving or product-information team needs to understand. The views should identify the actual component and sample version, without exposing private wearer information. If the fastening is changed later, those images should be replaced in the active record. This gives the final handover a practical visual reference for the feature that distinguishes the garment from a conventional shoulder-strap dress.
The final detail record should include the sample identifier, material and component references, measurements, front and back drawings, inside views and the agreed fastening setup. Add the consolidated comments and the evidence that closed each important issue. If the approval is limited to a development stage, say so. A positive sample review does not automatically authorize bulk production, confirm quantities or establish commercial terms. The next release should be a separate, explicit decision based on the current document set.
Review public imagery and descriptions against the accepted garment. Photographs should show the actual neckline and back arrangement, with appropriate rights for any wearer shown. Do not use styling or editing to conceal an unresolved fit concern. Describe the material, lining, fastening and included components accurately, and keep unverified support or performance statements out of the copy. If the final sample differs from the photography version, identify the difference and correct the presentation before the product is offered to customers.
For future orders, retain the accepted record and compare proposed changes with it. Reconfirm component and material availability, and ask which changes need another sample or review. A different tie, neck band or lining should not inherit approval merely because it looks similar in isolation. The useful reference is the whole garment that the buyer accepted. Preserving that record helps a repeat-order discussion focus on actual differences rather than reconstructing decisions from memory.
To discuss halter neck dress development with Yinshan Fashion, send the neckline and back brief, including front, side and back references, proposed fastening, materials, size range, quantities and the fit questions to resolve. If specialist support or internal structure is requested, identify it clearly for feasibility review. The next step should establish what will be sampled and how it will be assessed, so the eventual approval rests on a complete garment rather than an assumption hidden behind a striking neckline.
Review sequence before the next sample
- Map the complete neckline and back arrangement.
- Specify fastening, adjustment and intended use.
- Review the sample, dressing sequence and size questions.
- Approve the identified details and current document set.
Occasionwear development checklist
Actions before the next sample
Use the current brief and the identified garment to close the next development decision.
Complete the back drawing
Show ties, closures and attachments. Label anything the reference images do not establish.
Observe the operation
Review how the sample is put on, fastened and removed. Record assistance or adjustment where relevant.
Align the final details
Keep drawings, components, size records and dressing instructions tied to the same accepted sample.
Buyer action and factory confirmation
Use these questions with the identified garment and current programme brief.
| Decision area | What the buyer should prepare | What to ask the factory |
|---|---|---|
| Design connections | Provide front, side, back and relevant inside views. | Which relationships need feasibility or construction review? |
| Fastening | Define the intended operation and visible finish. | What component and sample work can assess the request? |
| Coverage | State fit reference and intended underlayer conditions. | What evidence is needed for the specific support or coverage requirement? |
| Wearer observations | Record location, activity and feedback respectfully. | What technical investigation should follow the concern? |
| Release record | Consolidate version, material and size decisions. | Which changes or variants remain outside the approval? |
Continue the production conversation
Halter dress details that need a shared decision
| Decision | Buyer direction | Record to retain |
|---|---|---|
| Front and back | Choose one coherent design from the references. | Linked front, side and back drawings with connection points. |
| Fastening | Define appearance, operation and adjustment. | Component reference and open/closed sample views. |
| Support and coverage | State expectations as requirements to assess. | Identified construction and review evidence without universal claims. |
| Use | Review dressing and agreed movements comfortably. | Sequence, wearer feedback and actual garment position. |
| Size and revision | Assess changed connections as part of the whole garment. | Versioned detail record and the agreed size-review scope. |
Buyer FAQs
What is essential in halter neck dress development?
Halter neck dress development needs a complete front, side and back brief, including connections, fastening, adjustment, coverage and intended use. Specialist internal features require explicit feasibility review. The sample decision should identify the actual garment, setup and evidence being accepted.
Is a halter dress the same as a spaghetti-strap dress?
No. A halter arrangement is organized around the neck, while a conventional spaghetti-strap design uses narrow straps over the shoulders. The names alone still do not define every connection or construction detail. Draw and review the actual proposed garment.
Can a back-view photo define the fastening?
Not usually. A back photograph may show the appearance without explaining the component, opening or dressing sequence. Include close and inside views where useful, describe how the fastening should work and assess the actual sample before accepting the detail.
Should internal support be assumed from the design image?
No. A fitted image does not establish cups, boning or a particular support result. State the requirement and ask for technical feasibility and sample evidence. Product claims should remain within what has been substantiated for the identified garment.
What should be recorded after a fit concern?
Record the sample version, setup, location, activity and the wearer's feedback, together with relevant garment observations. Stop if discomfort occurs. Ask the technical reviewer to investigate rather than prescribing an unverified correction, then document the next sample decision.